
Pretzels and caramel…what a great combination!
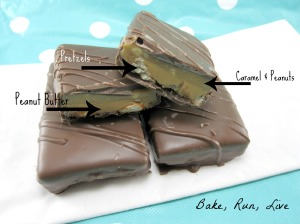
They are the ingredients for this months Behind the Curtain dessert challenge! As soon as I saw the ingredients, I knew what I wanted to make…homemade Take 5 candy bars! Layers of pretzels, peanut butter, caramel, and peanuts, all covered in chocolate. YUM!
I ended up making 2 batches of these, as I wasn’t completely happy with the first batch- the peanuts didn’t stick to the caramel. I knew what I did wrong right away (I let the caramel cool too much), so it was an easy fix. The funny thing is that the first batch was gone before I made the second batch (5 days later)! Yeah, they are that good (even without the peanuts!). I have a feeling the second batch won’t last much longer!
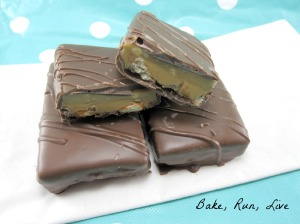
Homemade Take 5 Candy Bars
Mini pretzels (I needed 77 + a few broken pieces)
Peanut Butter Layer:
2 cups creamy peanut butter
1/2 cup powdered sugar
1 teaspoon vanilla extract
Caramel Layer:
1/4 cup butter
1/2 cup sugar
3/4 cup light corn syrup
1 cup heavy cream (also called whipping cream)
5 oz (just shy of 2/3 cup) sweetened condensed milk
1 cup salted peanuts, finely chopped
Milk chocolate for dipping
Line an 10 x 15 inch cookie sheet with aluminum foil and spray lightly with cooking spray. Set aside.
To make the peanut butter layer:
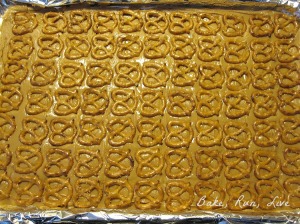
In a microwave-safe bowl, mix together the peanut butter, powdered sugar, and vanilla extract. Stir until all the powdered sugar has been incorporated. Microwave for 20 seconds on high, then stir. Repeat this again. Spread the mixture evenly on the aluminum foil of your prepared pan. Place your pretzels onto the peanut butter mixture, leaving a very small space between each one (enough for a knife to go through). Note: Mine was 7 pretzels across and 11 pretzels down. This left me with a space along the bottom that wasn’t wide enough for another row of pretzels, so I filled it with broken pretzels. Place the tray in the freezer while you are making the caramel layer.
To make the caramel layer:
In a large saucepan, combine all the ingredients except for the peanuts. Place this over medium heat and bring to a boil, stirring continuously. Boil (continue stirring- the caramel will burn if you stop stirring) until the mixture reaches 236 degrees. Remove from the heat and stir until it stops bubbling. Add in the chopped peanuts. Set aside for a moment.
Remove the cookie sheet from the freezer. Carefully flip the peanut butter layer onto a cutting board (or another large cookie sheet). Peel off the aluminum foil and place it back onto the original cookie sheet. Your peanut butter layer should now be facing up. Transfer this onto the aluminum foil (if it breaks, that’s ok, just press it back together).* Pour the caramel layer over the peanut butter in an even layer. Note: I only used 3/4 of the caramel and poured the rest into a greased ramekin.** Set the cookie sheet aside to cool completely (about an hour).
After an hour, place the cookie sheet in the refrigerator for an hour.
To finish the candy bars:
Line a cookie sheet with wax paper. Set aside. Melt the milk chocolate according to your favorite melting method. Remove the candy from the refrigerator and flip it out onto a cutting board. Remove the aluminum foil. Cut the candy, following the spaces between the pretzels, making 11 rows. Then cut after every 2nd pretzel (see picture below). Flip the candy over (this is the last time, I promise!), and using a fork, dip each piece into the melted chocolate. Let the excess drip off for a second, then place it onto the wax paper lined cookie sheet. Repeat until all the candy has been dipped (or you run out of room on the cookie sheet). Refrigerate for 5-10 minutes, or until the chocolate has set. Peel the candy off the wax paper, and if needed, finish dipping the rest of the candy. Enjoy!
Notes:
*The process I just described- I am having you invert the candy. I did this as the peanut butter mixture is a little too thick to spread it on top of the pretzels (and to keep the pretzels in nice, neat rows).
**I only used 3/4 of the caramel in order to keep all the layers even in thickness. If you like more caramel, go ahead and use all of it for your candy bars.
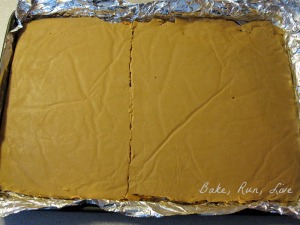
This is showing the peanut butter/pretzel layer inverted. Now it’s ready for the caramel.
Made with love, not calories!
Powered by Linky Tools
Click here to enter your link and view this Linky Tools list…
I’m linked at: Frugal Girls, Craftionary, The Busy B Hive, Semi Homemade Mom, Hungry Little Girl, Cornerstone Confessions, Dysfunction Junction, My Turn For Us.


